Shower pan leak water damage: quick answers before the problem spreads
Shower pan leak water damage starts when water escapes the waterproof shower base and saturates materials that are not designed to stay wet, including mortar beds, subfloor plywood, drywall, and framing. Shower pan leaks often stay hidden for weeks or months because water travels under tile and behind walls before staining appears. Early action limits mold risk and prevents rot, tile failure, and structural weakening.
Homeowners in Prosper and Celina, TX often notice indirect clues first, including musty odors, loose floor tile, cracked caulk at corners, or staining on a ceiling below the bathroom. Shower pan failures commonly come from aging liners, improper installation, drain-connection problems, or movement that stresses seams. A controlled flood test and targeted inspection help confirm whether the shower pan, the drain seal, grout, or behind-the-wall plumbing causes the moisture. Licensed Prosper TX plumbing professionals at Specialty Plumbing handle leak source verification, repair planning, and code-aware restoration steps when water has moved beyond the shower footprint.
What shower pan leak water damage is and why shower pan leaks stay hidden
Shower pan leak water damage is moisture intrusion caused by a failed waterproof layer under the shower floor that allows water to bypass the drain and soak into the building structure. Shower pan leak water damage often stays concealed because tile and grout can look intact while water migrates through mortar, fastener penetrations, or liner seams. Shower pan leak water damage typically appears later as odors, stains, or tile movement rather than as obvious standing water.
What a shower pan includes (and where failures usually happen)
A shower pan is the waterproof base beneath the shower floor that directs water to the drain. A traditional tiled shower pan often includes a sloped mortar bed, a waterproof liner (commonly PVC or CPE), a clamping drain assembly with weep holes, and a second mortar layer under the tile. A prefab shower base often uses fiberglass, acrylic, or composite materials with an integrated slope.
Common failure points concentrate around transitions and penetrations:
- Shower drain flange connections and compression seals
- Curb corners and liner folds at the shower threshold
- Fastener penetrations through the liner near the curb
- Weep holes blocked by mortar or debris, causing water to pool in the pan assembly
- Cracks in fiberglass or acrylic bases from impact or flexing
Why “small” shower pan leaks cause “big” damage
Water intrusion from a shower base leak can saturate wood and gypsum repeatedly, and repeated wetting cycles accelerate deterioration. Mold growth risk increases when moisture stays trapped in low-airflow cavities, including under tile and behind backer board. Tile loosening often follows adhesive breakdown after chronic dampness.
What causes a shower pan to leak (root causes homeowners can verify)
Shower pan leaks usually come from liner deterioration, installation errors, drain connection failures, or movement that opens seams and cracks. Shower pan leaks also get misdiagnosed because failed grout, failed caulk, or a leaking valve behind the wall can mimic a pan failure. Shower pan leak diagnosis works best when symptoms get matched to a controlled test rather than assumptions.
Primary causes of shower pan failure
- Aging materials: PVC liners and fiberglass bases can become brittle, crack, or lose sealing integrity after years of use.
- Improper installation: Incorrect slope, punctured liner, missing corner dam folds, or blocked weep holes can cause water to escape the intended drainage path.
- Excess movement: Home settlement and soil movement can stress joints, corners, and drain connections, leading to gaps or hairline cracks.
- Drain connection failure: A worn gasket, loose clamping ring, or degraded seal at the drain can leak even when the liner remains intact.
- Physical damage: Dropped objects, aggressive scraping, or tile replacement work can crack a base or compromise a liner.
Shower pan leak vs. “shower enclosure leak” (common confusion)
A shower pan leak involves the waterproofing under the shower floor. A shower enclosure leak often involves corners, door sweeps, glass channels, or splash-out patterns that put water outside the shower footprint. A correct fix depends on identifying the leak pathway rather than replacing materials blindly.
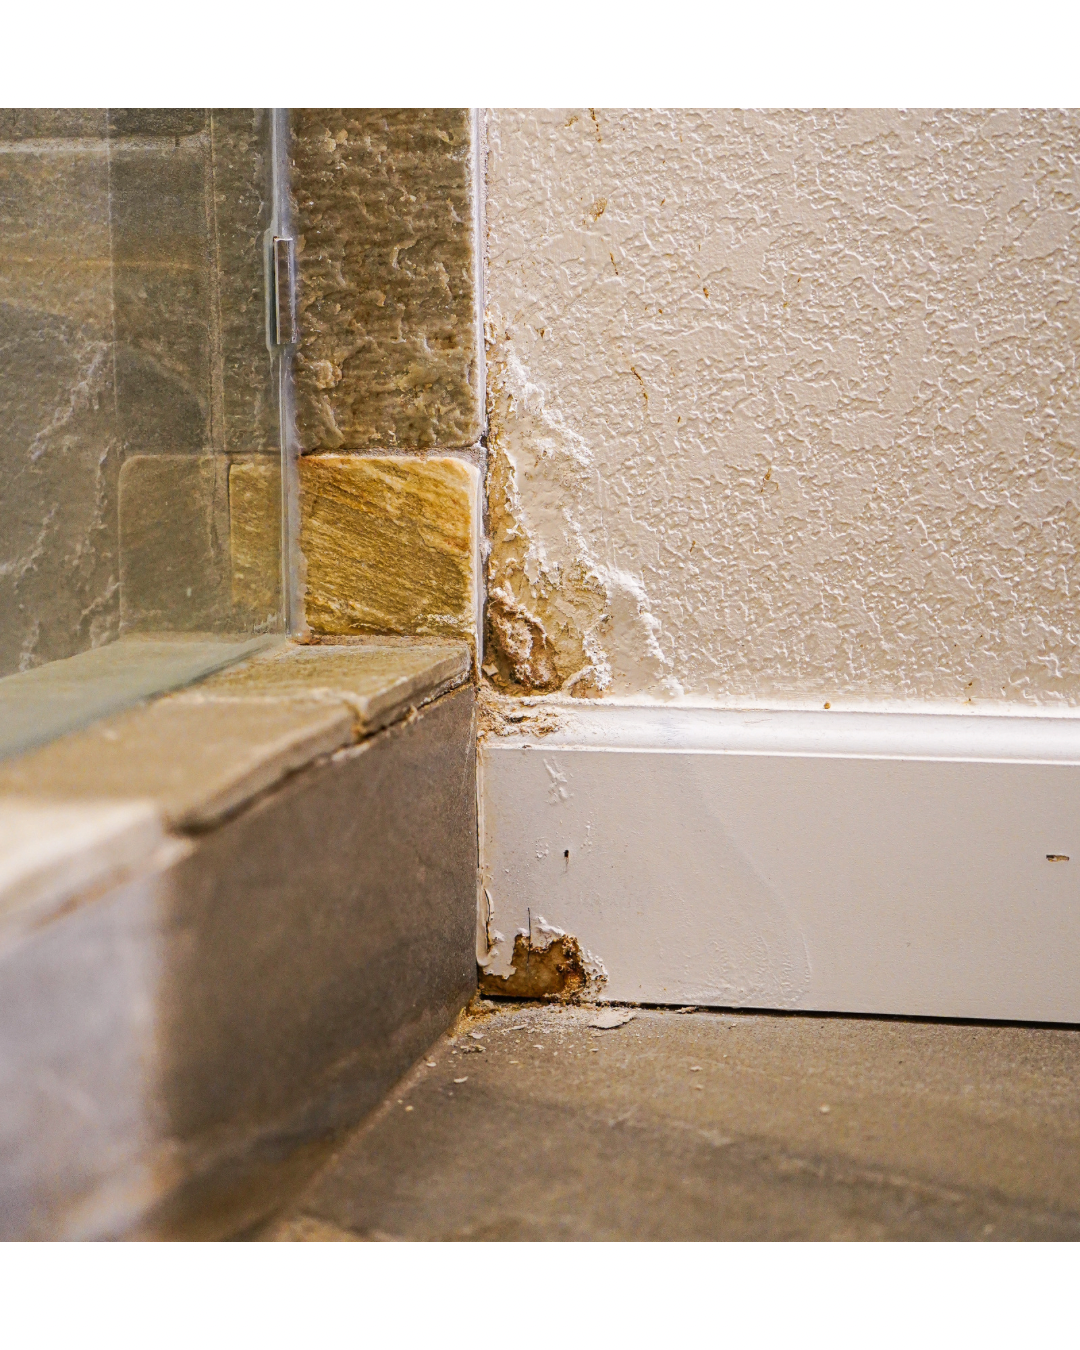
Signs of shower pan leak water damage (what homeowners usually notice first)
Shower pan leak water damage usually shows up as musty odors, loose or “squishy” tile, staining on adjacent surfaces, or warping in nearby flooring. Shower pan leak water damage can also present as ceiling stains in a room below the shower or as mold growth at the shower base perimeter. Shower pan leak warning signs often start subtly and worsen with repeated shower use.
High-signal symptoms that strongly suggest a pan or drain issue
- Loose, rocking, or hollow-sounding floor tile: Tile movement often indicates saturated mortar or a compromised substrate.
- Musty odor that returns after cleaning: Persistent odor often signals moisture trapped under the shower floor or behind wall board.
- Brown stains or bubbling paint on a ceiling below: Ceiling staining often indicates prolonged moisture migration through framing and drywall.
- Warped baseboards or buckling flooring outside the shower: Adjacent flooring changes often indicate water escaping the shower footprint.
- Mold or mildew at the shower base edge: Recurring growth at the perimeter often indicates chronic dampness behind the finished surface.
- Water pooling outside the shower after normal use: Repeatable pooling patterns often indicate a leak pathway rather than splash-out.
Subtle clues that still matter
- Grout that stays dark long after a shower ends
- Caulk lines that separate at corners or along the curb
- A soft spot at the shower threshold or just outside the curb
- A bathroom fan that runs normally but humidity never seems to clear
A homeowner story from Prosper illustrates the pattern: a persistent musty smell led to a later discovery of a slow shower base crack that had already saturated the subfloor. A slow leak often causes broader damage than a short, obvious spill because repeated wetting continues unnoticed.
What to do immediately when shower pan leak water damage is active (damage-control checklist)
Shower pan leak water damage control starts by stopping water use, containing spread, and reducing moisture levels to slow mold growth. Shower pan leak water damage control also includes electrical safety checks when water approaches outlets, lights, or ceiling fixtures. Shower pan leak damage control works best when actions happen in minutes, then hours, then days.
Stop water exposure at the source
Shower use should stop immediately to prevent additional saturation. Bathroom fixture shutoff valves can reduce risk when a supply-side leak is suspected. Another bathroom or temporary bathing alternative prevents repeated wetting while diagnosis happens.
Contain and protect nearby materials
Towels and absorbent barriers should block water from reaching baseboards, doorways, and adjacent flooring. Bath mats and rugs should move to a dry area because trapped moisture can wick water into flooring seams. Plastic sheeting under wet items can prevent secondary staining.
Address electrical safety before drying
Electrical breakers should be turned off for any circuit serving wet ceiling areas, wet wall cavities, or outlets near active seepage. A licensed electrician should evaluate any fixture that shows water staining or dripping. Personal safety should take priority over cleanup speed.
Start controlled drying and ventilation
Fans and bathroom exhaust ventilation should run to reduce humidity and surface moisture. Dehumidification helps when indoor air feels damp, especially during humid weather. Moisture trapped under tile often requires professional assessment because surface drying does not confirm cavity drying.
Document conditions for insurance or contractor coordination
Photos and short notes should record stain locations, odor timing, and when moisture appears relative to shower use. A simple log can include dates, which shower was used, and where water showed up. Documentation helps a licensed plumbing professional narrow the likely failure point faster.
How to diagnose the source (symptom-to-solution map plus reliable tests)
Shower pan leak diagnosis uses repeatable tests to separate pan failures from drain seal issues, grout and caulk failures, and behind-the-wall plumbing leaks. Shower pan leak diagnosis often starts with a controlled flood test and then moves to targeted inspection of drain components and adjacent cavities. Shower pan leak diagnosis prevents unnecessary tear-out by confirming the leak pathway first.
Symptom-to-solution map (quick extraction table)
| Symptom (repeatable pattern) | Likely cause | Practical next step |
|---|---|---|
| Water appears only after shower use | Shower pan liner failure or drain seal leak | Stop using shower and schedule a pan/drain inspection |
| Water appears when shower has not been used | Pressurized supply leak, valve leak, or condensation | Check access panels, valve area, and supply connections |
| Water appears at corners or curb edge | Failed caulk, failed corner waterproofing, or enclosure leak | Inspect corners and curb transitions; verify with controlled tests |
| Ceiling stain grows after each shower | Ongoing leak into framing | Document stain growth and arrange professional leak location |
| Musty odor persists despite cleaning | Hidden moisture under tile or behind board | Use moisture measurement and confirm drying needs |
Run a “no-splash” shower test
A handheld showerhead or a low-splash shower should run while water stays directed at the drain area. A dry paper towel placed outside the curb can reveal outward seepage. A repeatable wet pattern helps separate splash-out from a structural leak.
Perform a controlled shower pan flood test (when appropriate)
A shower pan flood test plugs the drain and fills the shower base with a few inches of water, then monitors the water level and checks adjacent areas for moisture. A flood test should not run when an active ceiling leak threatens electrical fixtures. Many tiled shower systems require careful plug placement to avoid damaging drain components.
Inspect the drain strainer and visible seal areas
A drain strainer removal can reveal debris buildup and surface corrosion. A clamping-style drain relies on weep holes, and blocked weep holes can trap water in the mortar bed. A drain connection leak can mimic a liner failure when water bypasses the compression seal.
Check caulk and grout transitions with a flashlight
Cracked caulk at wall-to-floor corners often channels water behind tile before water reaches the pan. Missing grout can allow water to enter the setting bed faster than normal. Caulk and grout problems can coexist with a pan problem, so confirmation testing still matters.
Professional leak location methods (what a plumber may use)
Licensed plumbing professionals may use dye testing, moisture meters, targeted access inspection, and controlled water isolation to identify the leak source. Moisture mapping can show the highest saturation zones, which often point toward the origin. Specialty Plumbing uses practical, code-aware troubleshooting rather than replacing parts based on guesswork.
For broader leak prevention context, homeowners often benefit from a periodic inspection approach described in Plumbing Inspection in Prosper, TX: A Homeowner’s Guide to Preventing Leaks, Water Damage, and Surprise Repairs.
Common repair paths for shower pan leak water damage (from minor to full rebuild)
Shower pan leak water damage repair usually combines plumbing repair, waterproofing correction, and building-material restoration. Shower pan leak water damage repair can range from re-sealing a drain connection to replacing a liner and rebuilding the shower base. Shower pan leak water damage repair should include drying verification because hidden moisture can restart mold and odor problems after cosmetic fixes.
Repair options (what each option typically addresses)
| Repair approach | Best fit scenario | Key limitation |
|---|---|---|
| Drain seal or gasket correction | Leak traced to drain connection | Drain work cannot fix a cracked liner or failed corner folds |
| Re-caulking and re-grouting | Water escaping through surface gaps without pan failure | Surface sealing cannot correct saturated substrates or liner damage |
| Pan liner replacement or shower base replacement | Liner cracked, punctured, or improperly installed | Replacement often requires tile removal and rebuild steps |
| Subfloor and wall material repair | Subfloor rot, swollen drywall, or moldy backing | Material repair should follow verified drying and source correction |
What “done correctly” usually includes
- Waterproofing installed per manufacturer instructions for the specific system used
- Correct slope toward the drain so water does not pond
- Drain assembly compatibility with the chosen waterproofing method
- Drying and moisture verification before closing cavities
- Replacement of compromised materials rather than covering damage
Industry practice often follows manufacturer-specific methods for waterproofing systems and drain assemblies. Manufacturer instructions vary across PVC liner systems, bonded waterproof membranes, and prefab bases, so the correct repair depends on the original build.
Homeowners dealing with recurring drain backups during shower repairs can also benefit from a drain-specific guide such as Drain Cleaning Near Me: A No‑Nonsense Homeowner Guide for Prosper & Celina, TX.
How long shower pan leak water damage repair takes (typical phases, not scheduling promises)
Shower pan leak water damage repair time depends on diagnosis time, drying time, and rebuild complexity rather than only the visible damage. Shower pan leak water damage repair often includes a same-day containment phase, a multi-day drying phase, and a rebuild phase that can extend longer when tile and substrate replacement is required. Shower pan leak water damage repair should not move to enclosure rebuild until moisture levels stabilize.
Typical timeline by phase (what happens over minutes, days, and weeks)
- Immediate phase (minutes to hours): Water exposure stops, spread containment begins, and safety checks occur for electrical risk.
- Early assessment phase (same day to several days): Leak source testing and moisture mapping confirm whether the shower pan, drain, or plumbing caused the damage.
- Drying phase (several days in many cases): Dehumidification and airflow reduce moisture in structural materials, and moisture readings confirm progress.
- Repair and rebuild phase (days to weeks depending on scope): Drain repair, waterproofing correction, tile replacement, and subfloor or drywall restoration occur as needed.
- Post-repair verification phase: A controlled test confirms leak resolution before regular use resumes.
Humidity, material thickness, and airflow all influence drying time. A tiled shower assembly can hold moisture longer than a surface spill because mortar and backer materials release moisture slowly.
What drives variation in repair complexity and pricing (without guesswork)
Shower pan leak water damage repair pricing varies by scope, accessibility, materials, and the extent of hidden damage. Shower pan leak water damage repair complexity increases when water reaches subfloors, wall cavities, or rooms below the bathroom. Shower pan leak water damage repair planning should account for demolition needs, drying verification, and code requirements.
The biggest factors that change the project scope
- Accessibility: First-floor showers with open access often require less invasive investigation than showers above finished ceilings or tight crawlspaces.
- Extent of damage: A drain seal repair differs dramatically from a rotted subfloor rebuild or wall cavity remediation.
- Materials and finish matching: Tile availability and waterproofing system choice influence labor steps and coordination needs.
- Age and condition of plumbing: Corroded fasteners, old drains, and prior DIY patches can complicate disassembly and reassembly.
- Dry-out requirements: Drying and verification steps add time and process complexity even when visible damage looks minor.
- Local code considerations: Plumbing and waterproofing methods may require code-aligned components and installation practices.
Pricing varies by project scope, material selection, and site conditions in Prosper and Celina, TX. A licensed plumber can provide options after confirming the leak source and the extent of damage.
Pro tips that prevent repeat shower pan leak water damage
Shower pan leak prevention focuses on correct waterproofing details, routine seal maintenance, and early detection of moisture changes. Shower pan leak prevention also includes verifying drain performance and keeping transitions sealed with appropriate materials. Shower pan leak prevention reduces the chance of hidden saturation that leads to mold and rot.
- A shower pan flood test after a rebuild can confirm waterproofing integrity before tile and trim conceal the assembly.
- 100% silicone caulk performs better in wet-area transitions than acrylic or latex caulk.
- A moisture meter can help confirm whether drywall and baseboards near the shower are drying or staying damp.
- Spare tiles stored after installation improve the chance of a close match during future repairs.
- Mold growth can begin quickly when moisture stays trapped, so early drying and source correction matter.
For additional DIY boundaries and safe troubleshooting habits, homeowners often reference Plumber Prosper TX: How to Diagnose Common Problems, Try Safe DIY Fixes, and Know When to Call a Licensed Pro.
DIY vs. professional help: a practical decision tree
Shower pan leak water damage sometimes allows limited DIY work, but shower pan leak diagnosis and structural repairs often require professional tools and experience. Shower pan leak repairs become higher-risk when water reaches subfloor framing, electrical areas, or multiple rooms. Shower pan leak uncertainty often costs more when repeated surface fixes delay the correct repair.
DIY may be reasonable when all conditions are true
- Caulk failure appears limited to an accessible transition with no signs of subfloor softness
- No staining appears on ceilings or adjacent rooms
- No tile movement or “squish” appears underfoot
- Moisture does not return after a careful reseal and cure period
Professional help is the safer path when any condition is true
- Shower pan liner cracks, base cracks, or curb corner failures appear
- Tile movement, soft spots, or persistent musty odors suggest trapped moisture
- Water staining appears below the bathroom or behind nearby walls
- Electrical fixtures, outlets, or HVAC registers show moisture exposure
- Leak source remains uncertain after controlled testing
Specialty Plumbing is a locally owned, full-service provider staffed by licensed Prosper TX plumbing professionals, and Specialty Plumbing can confirm leak sources and coordinate repair steps for homeowners in Prosper and Celina, TX. Availability varies; contact Specialty Plumbing to confirm scheduling and coverage.
Common questions about shower pan leak water damage
How can a homeowner confirm shower pan leak water damage instead of a grout or caulk problem?
A shower pan flood test can help confirm a pan or drain leak by showing water loss or moisture outside the shower footprint while the shower walls stay dry. A grout or caulk problem often leaks only during active showering when water hits wall surfaces. A licensed plumber can add dye testing and moisture mapping for a more precise diagnosis.
Can a homeowner keep using a shower with suspected shower pan leak water damage?
Continued shower use can increase saturation and expand damage into subfloors, wall cavities, and ceilings below. A safer approach involves stopping shower use until the leak source is confirmed and corrected. Another bathroom or temporary bathing alternative prevents repeated wetting.
What types of damage can shower pan leak water damage cause inside a home?
Shower pan leak water damage can cause wood rot, mold growth, loose tile, swollen drywall, and stained ceilings. Shower pan leak water damage can also weaken framing over time when moisture stays trapped. Early repair usually limits the repair footprint.
How long does shower pan leak water damage take to show visible signs?
Shower pan leak water damage can remain hidden for weeks or months because water travels under tile and behind walls before staining appears. Odors and tile movement often appear before ceiling stains or visible mold. A controlled test can reveal problems before major cosmetic signs develop.
What repair approach fixes shower pan leak water damage permanently?
Permanent repair requires correcting the leak source, verifying drying, and restoring damaged materials rather than sealing over wet substrates. Drain seal repairs work only when the drain connection is the confirmed failure point. Pan liner replacement or base replacement becomes necessary when waterproofing integrity is compromised.